
home | topos &
beta | photos | trip
reports | links
MOUNT BALDY
Area Description
Way back in the dark ages (1970's) this area was popular with the Stonemasters.
There is decent bouldering nearby, but the best stones are located on private
property. There's a vintage, 1970's-era, bolt ladder in the San Antonio
Wash , south of an area called the Water Slide. Some rebolting has occurred,
so every 4th or 5th bolt is kinda safe. Quite overhanging.
Directions
Look at this map to get to Mt. Baldy Road, from
there follow these directions. About a 1/4 of a mile south of the Mt. Baldy
School turn right onto Barrett Rd. and park near the trees. Walk south down
the wash, stay to the west of the wash. You will come to an old paved road
and the wash becomes steep. Follow the paved road until you can find a safe
way to get down into the wash and then go back north up the wash until you
reach the Water Slide. The route is located on the east side of the wash.
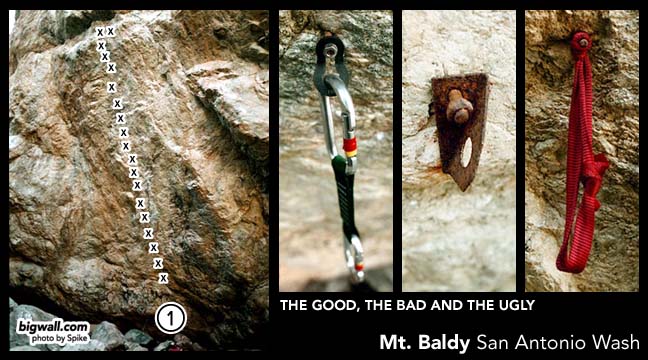
- 1) BOLT LADDER (C1)
- This steep bolt ladder is on the east side of the wash, south of the
Water Slide. Some good (newer) bolts, mostly bad bolts and a few ugly ones.
17 bolts, 2 bolt anchor.
- Pro: Cinch or rivet hangers, small diameter webbing to girth hitch
bolts or FISH Doubloons, and 1/4" - 5/16" keyhole hangers.
TOP OF PAGE
MILLARD FALLS
Area Description
Located in the narrow Millard Canyon adjacent to a nice waterfall and stream
in the hills above Altadena/Pasadena. This 70 foot high wall is composed
of gneiss and contains two ancient bolt ladders up an overhanging wall.
The waterfall is popular with hikers and families especially on the weekends.
This is not usually a problem, but caution should be exercised to keep people
from wandering below your party.
Directions
From the West: 210 Freeway East. Exit Arroyo Windsor, turn
left onto Windsor. Cross over freeway. Turn right onto Woodbury. Turn left
on Fair Oaks. Follow Fair Oaks until you hit a stop sign at Loma Alta. Turn
left onto Loma Alta and drive to a flashing yellow light. Turn right at
the flashing light onto Chaney. Drive up Chaney into the hills. Upon reaching
the crest, bear left and go back downhill to Millard Campground. Park in
the lot outside the gated drive. Walk 200 yards up the paved road, pass
the restrooms and take the trail to the right that leads to the waterfall.
Easy 1/2 mile hike along the streambed to the obvious waterfall grotto.
From the East: 210 Freeway West. Exit Fair Oaks North, turn
right and follow the above directions.
From South: 110 Freeway North. Exit Fair Oaks, turn left,
cross freeway and follow the above directions.
Route Descriptions (going left to right)
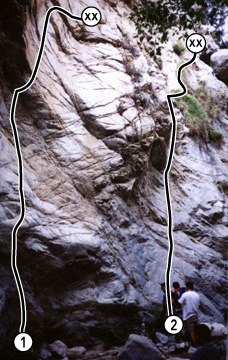
- 1) LEFT LADDER (A1)
- Fun bolt ladder on the left wall of the grotto. The first 1/4"
bolt sheared off on 4/29/02 and was replaced with a 3/8" Rawl w/ camoflaged
hanger. A cheatstone/stick clip may be required to reach the first bolt
if you're short. The second bolt is also a new 3/8". A few manky bolts
on this route. 50 foot rappel off of bomber 3/8" bolts with Metolius
Rap Hangers. If you wish to solo the route, take a long-thick Lost Arrow
and a 3/4" angle piton for your anchors. There's a few, small cracks
you can put bomber pins into at ground & waist level beneath the first
bolt (please be gentle). Or you can just rig an anchor with
the first two good bolts.
- Pro: 3-5 rivet hangers, biners for bolts.
- 2) RIGHT LADDER (A2)
- This bolt ladder is right of LEFT LADDER (duh) and just left of the
waterfall. Some really crappy bolts lead up a face to a corner system. Hard
moves on two blown bolt studs or cheatstick to gain a bolt at the top of
the corner. Hook moves lead right to more bolts up some grassy ledges. 70
foot rappell off of old 1/4" bolts.
- Pro: 5-7 rivet hangers, hooks including bathook, Fish Doubloons,
biners for bolts. Might want cheat stick.
TOP OF PAGE
EATON CANYON
Area Description
This area is a double-sided 40 foot high concrete wall beneath a bridge
in Pasadena. Several aid lines exist here as well as some bolted "glue-up"
leads and two bouldering traverses.
Directions
Eastbound 210: Exit Altadena Drive. Turn left onto Altadena. Several miles
uphill turn right on New York. The wall is located beneath the first bridge
you drive over. Park just past the bridge and enter the wash via a hole
in the fence on the south side of the street. Follow the stream bed to the
bridge wall.

WESTSIDE
Route Descriptions (going left to right)
The graffitti in the photos has changed, so the "landmarks" are
different now (2/02).
- W1) MANLY MAN (A3)
- Thin crack on the left of the wall. A little beat out. Protected with
bolts up high.
- Pro: Beaks, RURPS, heads.
- W2) CALIFORNIA DREAMIN' (C1)
- The obvious splitter crack in the center of the wall. The easier of
the twin cracks.
Pro: Gear to 1".
- W3) GOOD DOG (A2+)
- Thin discontinuous cracks on the right side of the wall. Bolt ladder
up high.
- Pro: Beaks, RURPS, KBs and one 3/4" angle.
EASTSIDE
E1) X-RATED (A3)
- Thin crack in center of left half of the east wall. Protected with
bolts up high. MISMARKED IN PHOTO. CLIMB THE NEXT CRACK TO THE RIGHT. One
bolt at the base for soloing.
- Pro: Beaks RURPS, KBs, (Bolt Hanger for solo).
- E2) NEW YORKER (C1)
- The obvious splitter crack in the center of the wall. 2 bolts for
the soloist's anchors are at the base.
Pro: Gear to #1 Camalot, (Bolt Hangers for solo).
TOP OF PAGE
TAMPA BRIDGE
Area Description
Several short (35') rivet and bolt ladders located under the 118 freeway
at Tampa Boulevard. There are also some glue-up bolted lead climbs here.
The routes are on the second and third bridges as the first bridge is quite
visible to the shops at the mall where you park.
Directions
118 Freeway, exit Tampa Boulevard. Go north. Turn left into first shopping
center and park at southeast corner of parking lot. Faint trail heads down
the grassy slope under the freeway overpass.
TOP OF PAGE
STONEY POINT
Area Description
Stoney Point City Park, in Chatsworth is where many famous climbers began.
Royal Robbins, Yvon Chouinard, Bob Kamps, John Bachar, Lynn Hill, John Long,
Herb Laegar have all left their mark. However, others have left their marks
too. Graffitti and trash are also well represented here. Variable quality
sandstone boulders and walls up to 150' tall. Respect the rock and climb
gently.
Directions
118 Freeway, exit Topanga Canyon Boulevard. Go south. You can't miss it.
Park on Topanga Canyon Boulevard.
Best clean aid line is Maggie's Farm (C2+). It's the curving hand
crack on the right side of Nabisco Canyon. Free route, so climb hammerless.
Be especially careful about climbing w/ gear on the sandstone. NEVER use
gear within a month of the last rain.
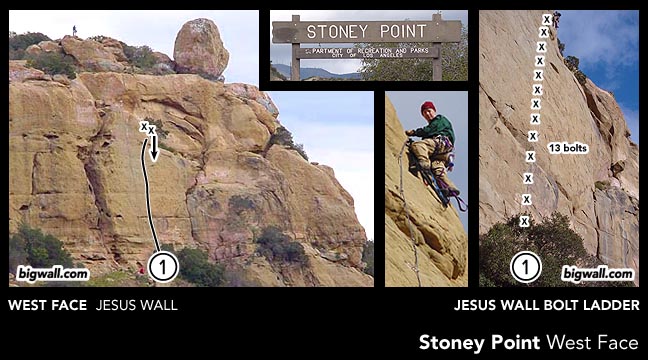
1) JESUS WALL (5.6, C1)
- This manky bolt ladder ascends the large blank face right of a huge
chimney system splitting the front wall and is clearly visible from Topanga
Canyon Blvd. Easy free climbing leads to the first hangerless bolt.
- Pro: Gear for 17 bolts, several rivet hangers.
- 2) HOT TUNA ROOF CRACK (C2+)
- Located on the north side to the right of Hot Tuna. 50 yards
south of Santa Susana Pass Road, walk up the well-worn dirt path to a plateau.
30 yards from the top of the path are several low roofs. The lowest is almost
a cave. This is the classic boulder traverse, Hot Tuna. Left of that is
a roof about 12' off the ground. Ascend the crack out the roof to join a
modern free route (bolt ladder) to the summit.
- Pro: Gear to 1".
- 3) MAGGIE'S FARM (C2+)
- From Hot Tuna walk 50 yards east to the second main canyon.
This is Nabisco Canyon, home of the best free routes Stoney has to offer,
thus there's almost always a gang of topropers here. Weekdays will be your
best bet to avoid pissing people off if you happen to get there first. Maggie's
Farm is the curving hand crack on the right side of Nabisco Canyon. Classic
free route, so climb hammerless and gently. NEVER use gear within a month
of the last rain.
- Pro: Gear to 4", big hexes or sawed off pins for handplacement
work well in the boxy scars up top.
TOP OF PAGE
MARTIAN LANDING
Area Description
More Santa Susana sandstone.
There's supposedly a 5.11 roof crack here, but hiking around we couldn't
find it. If it does exist, could make for some fun aid practice.
Directions
118 Freeway, exit Topanga Canyon Boulevard. Go south. Turn west onto Santa
Susana Pass Road. Parallel railroad tracks until right before the road makes
a severe right. Turn on a street and drive up the hill. Park, head west
into the County Park. Martian Landing roof crack is (reportedly)
on the west side of a large set of rocks.
TOP OF PAGE
ROCKY PEAK
Area Description
More Santa Susana sandstone. Rocky Peak lies on the border of Ventura and
Los Angeles Counties between Simi Valley and Chatsworth.
The roof is classic! Steep bolt ladder through an east facing, stellar roof.
A two pitch route.
Directions
From the East: 118 Freeway, exit Rocky Peak Road. Turn right
at top of exit ramp. Park at hiking trailhead for Rocky Peak Park. Limited
number of spaces. Weekends are busy. The area is also prone to high winds,
which when blowing make things interesting for sure.
From the West: Access is from Santa Susana Pass Road as there
is no westbound exit for Rocky Peak. (You could also just drive to Topanga
Canyon Boulevard and do a U-turn). At Rocky Peak Road, turn left and cross
the bridge to the parking lot for Rocky Peak Park.
Follow the road uphill for 15 minutes. About 150 yards past the first bench,
a faint climber's trail heads towards the right side of a large hilltop.
The path crosses a small spur road off the main road and heads up into the
brush. Soon it begins to stay at the same level and contour around the base
of several shortish walls (one has a pathetic roof). Continue working northward
until obvious bolted roof comes into view. 30 minute total approach.
An easier, but slightly further approach, does exist. However it is somewhat
difficult to locate parts of this trail. From the first bench, hike up the
road another 200 yards to a spot about 40 yards BEFORE the second bench
and the Hummingbird Trail. Another faint trail heads right, up the hillside.
The trail crosses several large slabs. After a very large slab, begin looking
for a faint trail that heads right and slightly downhill. Eventually a steep,
but easy gulley is encountered. Walk down this gulley to a large flat boulder
and turn left, hugging the cliffside until the obvious bolted roof comes
into view. 40 minute approach. There are some cairns as of 3/02.
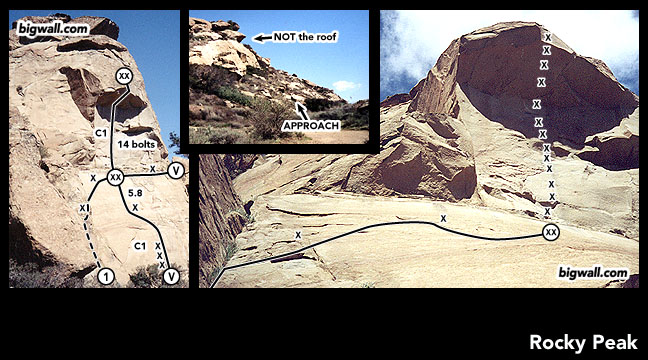
- 1) ROOF (5.8, C1)
- First pitch can be done one of three ways. First option is to climb
the easy gulley left of the big slab below the roof to a hangerless bolt.
Begin traversing right to a second bolt, (appears 5.7ish) then further right
to a two bolt belay. Second option (C1, 5.8+) would be the direct approach.
Aid past 3 hangerless bolts then freeclimb 20' to a bolt, then another 20'
to the anchors. The third option: it appears one can traverse in from the
right following the horizontal seam/crack at midheight passing a single
bolt to reach the first pitch belay. Getting over to the start of option
3 might be harder than the actual climbing. Second pitch (C1) takes a very
steep bolt ladder up an overhanging wall, then out and over a stunning roof.
14 bolts, 2 bolt belay. 165' rap to ground. Topping out requires bold freeclimbing
with marginal protection.
- Pro: Biners and draws for 14 bolts plus belay. Several rivet /
keyhole hangers.
- 2) THIN CRACK (A3+?)
- This route is passed on the walk to the roof, a 40' wall located 35
yards south of the roof. Looks like it's only been done once.
- Pro: KBs, LAs?
TOP OF PAGE
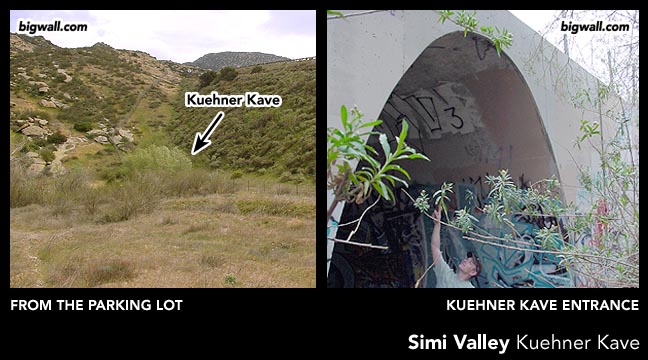
KUEHNER KAVE
Area Description
Just one exit from Rocky Peak lies this oddity. Technically it's in Ventura
County, but so close to everything else in Chatsworth we'll lump them together.
Horizontal bolt ladder (C1) along the roof of a flood control tunnel. Single
100' pitch to chain anchors in the dark. Bring a headlamp and don't do it
in the rain.
Directions
118 Freeway, exit Kuehner Road. Head north, towards the mountains, for 40
yards. Park along the side of the road, at a small lot, or 4wd over the
rutted ground to a spot 50 yards from the road. Looking east, towards the
highway is a group of trees at the base of an embankment. The tunnel is
hidden among these.
To actually access the bolt ladder, walk along the top of the concrete foundation,
lie on your stomach and clip into the chain with your daisy-chained aiders.
Swing on in and have fun.
TOP OF PAGE
BOX CANYON
Area Description
More Santa Susana sandstone. Box Canyon provides an opportunity to practice
nailing on soft sandstone.
Variable quality sandstone walls up to 200' tall. A couple routes are two
pitches long. Generally bad bolts (1/4" in soft rock) with Leeper hangers.
If you have a Hilti and the knowledge to place good, fat bolts, be our guest
and shore up the belays. This area has the hardest routes in this guide.
Be careful up there.
Directions
From the East: 118 Freeway, exit Rocky Peak Road. Turn left
at top of exit ramp. Cross over the freeway and turn right onto Santa Susana
Pass Road. Go almost a half-mile and turn left onto Box Canyon Road.Drive
1.5 miles down Box Canyon Road to a small pullout across from the house
at 476 Box Canyon. It is just before a house-sized boulder on the right.
From the West: Access is from Santa Susana Pass Road via Kuehner,
as there is no westbound exit for Rocky Peak. (You could also just drive
to Topanga Canyon Boulevard and do a U-turn). At Box Canyon Road, turn right
and drive 1.5 miles to a small pullout across from the house at 476 Box
Canyon. It is just before a house-sized boulder on the right.
From the parking spot, hike south for 50 yards to a dirt road/trail that
heads steeply uphill. Walk up this road, taking the obvious trail off to
the left. Follow poor cairns along faint trails up an ever-steepening hillside
towards the obvious arch and dihedral. Don't worry. You can't really get
lost. Bushwhacked maybe, but not lost. 15 minute approach to the wall from
the car.
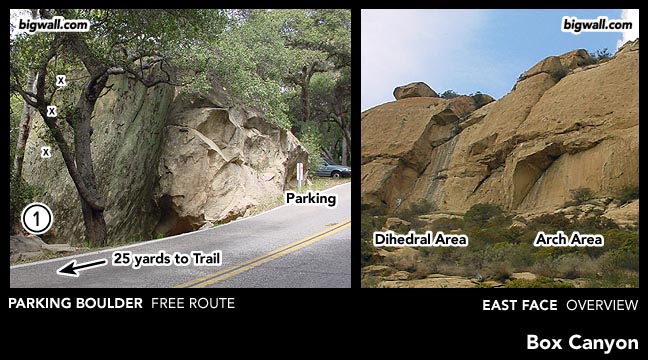
- 1) PARKING BOULDER (5.8)
- Three bolt (1/4" with Leeper hangers...don't fall!) route up
the mossy south face of the house sized boulder across from #478 Box Canyon
Road. Walk-off.
- Pro: Quickdraws.
- 2) SHIELD (A?)
- Nailing crack up bulging face just left of major dihedral. Not quite
sure where it goes or even how you get back down.
- Pro: Do it and tell us.
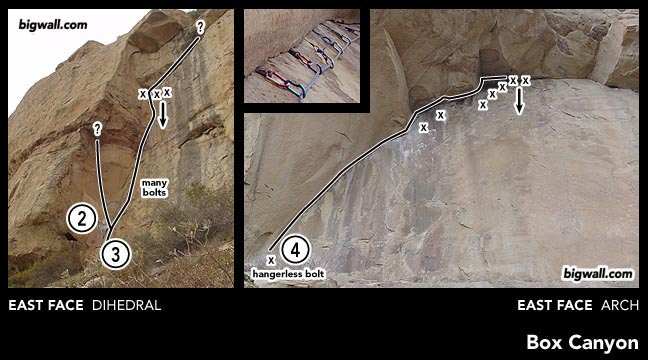
- 3) DIHEDRAL (C1?)
- This manky bolt ladder ascends the large right facing dihedral. Two
pitches?
- Pro: Gear for many bolts, several rivet hangers. Additional pro?
- 4) ARCH (A2)
- The route is pretty obvious. Climb the thin arching crack to a roof
with a short crappy bolt ladder. Say hello to the Swift Family, sobbing
son!
- Pro: 1 long thin LA, 2 ea. 1" angle, 1-2 ea. Alien (blue-red),
1 ea. #1 Camalot, several rivet hangers. Add a few more pins and some #3
Camalots to keep going for the bolts out the roof, then you're on your own.
Bring a hanger for a 1/4" bolt and a wingnut for the belay at the base.
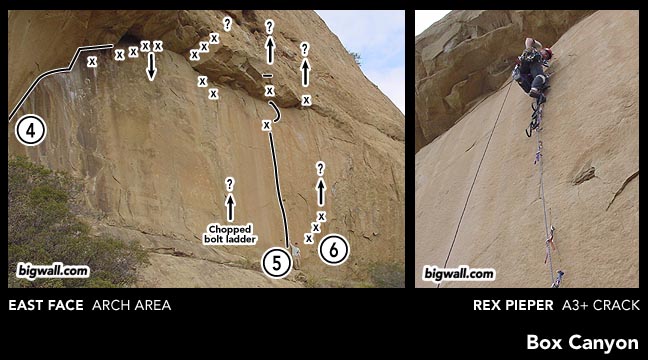
- Between Routes 4 and 5 is a chopped bolt ladder that appears to
head for the three bolts going across the roof block. Route #4 can be extended
to those bolts with some pins (A2), but we're unsure the line goes beyond
them as the rock quality becomes very poor beyond the roof. We turned around
and came back to the rap station.
5) A3+ CRACK (A3+)
- Thin seam with angle-sized pinscars leading to a bolt below the roof.
Fun, but fragile route. Overhanging too. I tried to climb hammerless, but
other than cam hooks, I got in nothing but pins. As usual, the bolts are
bad, especially the second one. Where the route goes after bolt #2, I don't
know. Probably a hook move is required on super soft rock, but I just didn't
feel like cranking on the second bolt very hard to get far above it. Yes
that's my new bail biner, no, I didn't rap soley off that. Use the bolts
on Route #6 as belay anchors on the ground.
- Pro: 1 ea. Pecker, 1 ea. Long Thick Bugaboo, 2 ea. Leeper Wide
Cam Hooks, 2 ea. sawed off 5/8" to 1" angles. Hooks? Screamers!
- 6) PSYCHO CRACK (A4?)
- Three modern 3/8" Rawl bolts with hangers head up the steep face
just right of the A3+ Crack. Binoculars spotted several bathook holes en
route to a micro beak seam. Eventually there's a bolt at the roof, but maybe
you follow a thin seam left to join the A3+ Crack below the roof. HellifIknow!
- Pro: Thin to none!
TOP OF PAGE
WOOLSEY CANYON
Area Description
More Santa Susana sandstone.
Roof crack above right facing corner. Rocketdyne Roof (C2) Pro to
4". Free route, so climb hammerless. Be especially careful about climbing
w/ gear on the sandstone. NEVER use gear within a month of the last rain.
Hiking around we couldn't find it. We think it might now be behind the Boeing
Front Gate and no longer accessible. If you know different, clue us in!
Directions
118 Freeway, exit Topanga Canyon Boulevard. Go south. Turn west onto Plummer
Street. Right onto Valley Circle. Right onto Woolsey Canyon Road. Pass the
Rocketdyne signs and drive to just before the gate. Park and hike up hill
to right (??)
TOP OF PAGE
home | topos &
beta | photos | trip
reports | links